Basic Networking: Amazon Virtual Private Cloud (VPC)

Networking can be referred to as the infrastructure and services that enable communication and connectivity between various resources, applications, and users within a cloud environment and the internet. In this article, we will learn about basic networking using Amazon Virtual Cloud (VPC) as a case study and explore components such as IP addresses, subnets, route tables, internet gateways, CIDR blocks, NAT gateways, and Security groups. As required, sign up for an AWS free account if you don’t have one already and grab your cup of coffee ☕ as we learn together.
Definitions
Amazon Virtual Private Cloud (VPC) is a private network that isolates the resources within it. See it as a fence around your resources in AWS. This virtual network closely resembles a traditional network that you’d operate in your own data center, with the benefits of using the scalable infrastructure of AWS.
Internet Protocol (IP) address is a numerical label that uniquely identifies a device, allowing it to be located and communicate with other devices on a computer network. It comes in two main versions: Internet Protocol Version 4 (IPv4) and Internet Protocol Version 6 (IPv6). IPv4 addresses consist of four sets of numbers separated by periods, such as “192.168.1.1,” while IPv6 addresses consist of eight groups of alphanumeric characters separated by colons, such as “2001:0db8:85a3:0000:0000:8a2e:0370:7334.”
Subnet is a defined set of network IP address ranges that increase the security and efficiency of network communication. This range is from the block of IP addresses allocated to the VPC. Resources can now be logically grouped within the subnets and managed appropriately. There are Public Subnets and Private Subnets. The resources within the public subnets are allowed to communicate with resources outside the VPC and the internet, while the resources within the private subnets can only communicate with resources within the VPC. With this, resources can be grouped depending on access requirements and security. Bear in mind that you have to have a subnet before you can launch a resource in your VPC.
Classless Inter-Domain Routing (CIDR) Block is a notation used to define the range of IP addresses assigned to a VPC or its subnets. It is represented in the form of an IP address followed by a forward slash and a number. The number indicates the number of bits in the network portion of the address and the number of IP addresses that can be obtained. Example: 10.0.0.0/16.
Security Group acts as a virtual firewall for your EC2 that controls incoming and outgoing traffic.
Internet Gateway (IGW): by default, VPC provides network isolation, meaning that the resources within your VPC cannot connect and communicate with other resources outside it. This implies that users cannot access your applications through the internet. The Internet Gateway is a component of VPC that enables communication between your VPC and the Internet. Resources in your public subnets can be accessed using their public IP addresses.
NAT (Network Address Translation) Gateway is a component in VPC that is used to enable instances in a private subnet to connect to services outside the VPC, but those services cannot initiate a connection with those instances. A common use case is when you want to update packages in your private instances. The NAT gateway will enable the instance to reach the internet and get the packages while denying any access from the internet.
Route Table contains a set of rules, called routes, that determine where network traffic from your subnet or gateway is directed. Each subnet in your VPC must be associated with a route table, which controls the routing for the subnet. The main route table is automatically associated with a new subnet; you have to manually associate your own route table with the subnet.
Now that we have learned about some components of VPC, let us move on to some hands-on experience with them.

Log in to your AWS account and follow the steps below to replicate the VPC architecture in the diagram above.
Create a VPC
- Search for VPC in the management console and click on it
- Click on Create VPC on the VPC console
- Select VPC only. This is to enable us manually create the other components so we have a better understanding of VPC
- Enter the name tag for the VPC and use 10.0.0.0/16 for the IPv4 CIDR range. We are using 10.0.0.0/16 in order to enable us to manipulate the last two numbers within the VPC. You will understand why we chose this as we proceed. Click here to read more about the CIDR range.
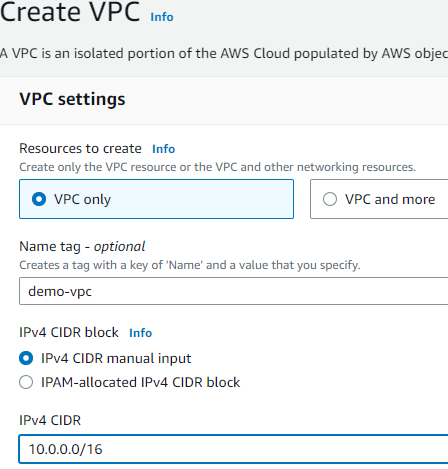
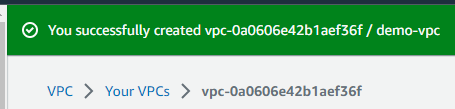
- Click on Create VPC.
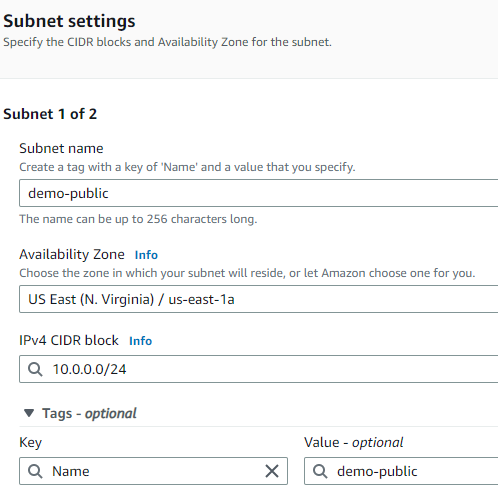
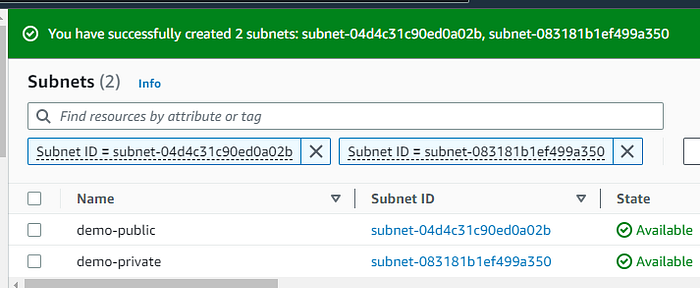
Create a public and private subnet
Within the VPC we just created, let us create a public subnet for public applications and a private subnet for private applications.
- Click on Subnets in the VPC console and click on Create subnet
- Under VPC ID, select the VPC we just created
- In the Subnet settings, let’s first create the public subnet. Enter the Subnet name of your private subnet and select your desired availability zone.
- The IPv4 CIDR block range still has to be within the one specified in the VPC, so we will use 10.0.0.0/24.
- Click on Add new subnet and follow the last two steps above to create the private subnet. But for the IPv4 CIDR block, use 10.0.1.0/24. We are using a different IPv4 CIDR range here in order to avoid conflicting IP addresses for the two subnets.
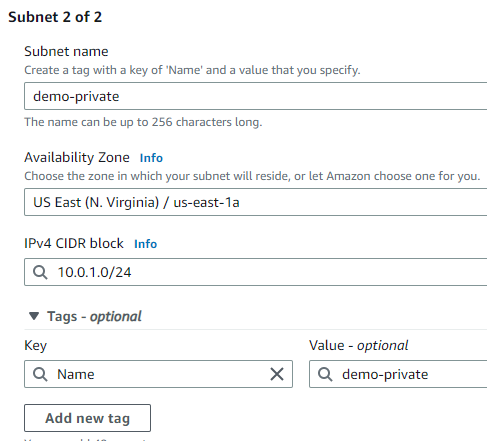
- Click on Create subnet to create both of them.
It is recommended that you Create two public subnets and two private subnets, one in a different availability zone. This is to increase availability. In a situation where an availability zone is down, the applications can still be accessed in the second availability zone. But for learning purposes, we will work with what is on the VPC architecture diagram above.
Launch an EC2 instance in the public subnet
- Search for EC2 under Services to go to the EC2 console.
- Click on the launch instance.
- Enter the name of your instance, and under the key pair name, select a key pair or create one if you don’t have one.
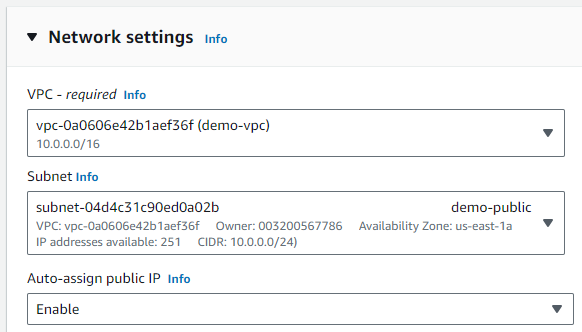
- Under Networking settings, click on Edit

- Under VPC, select the VPC we just created. For Subnet, select the public subnet and select Enable for Auto-assign public IP
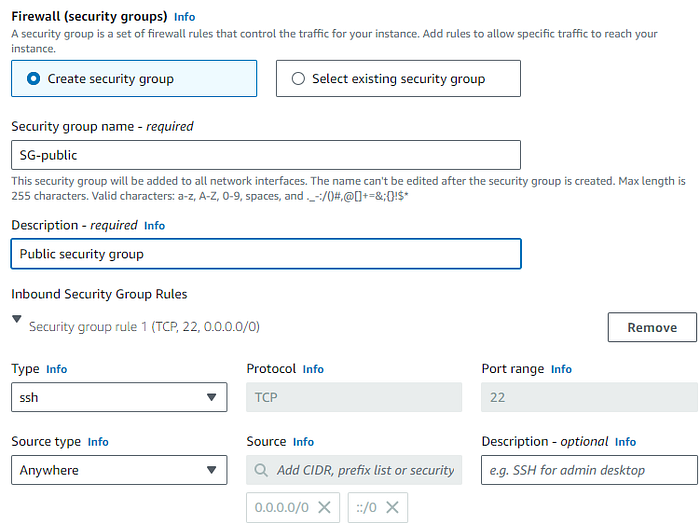
- Under Firewall (security group), Select Create security group.
- Enter the name and description of the security group and leave the default rule.
- Click on Launch instance.
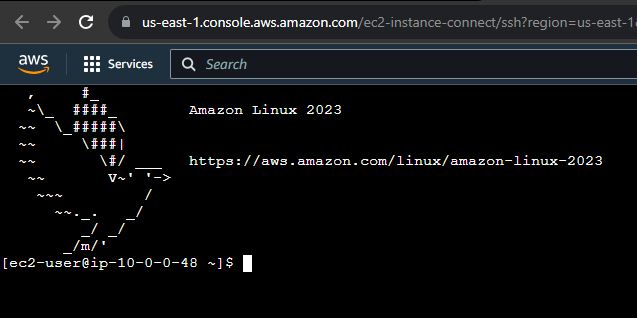
- After the instance is successfully created, under Next Steps, click on Connect to instance.
- Under EC2 Instance Connect, select Connect using EC2 Instance Connect and click on Connect.
Oops❗❗ ❗

So why can’t we connect to this instance?🤔 Remember what we learned earlier about VPC? How it provides an isolated network for our resources. This means we can’t connect to our instance through the internet yet. How do we enable access to the internet? Your guess is as good as mine. 😊
Create an Internet Gateway (IGW)
- Go back to the VPC console and click on Internet gateways
- Click on Create internet gateway. Enter the name of the gateway and click on Create internet gateway.
- After the IGW is successfully created, click on Actions and select Attach to VPC.
- Under Available VPCs, select the VPC we just created and click on Attach internet gateway.
So if we go back to connect to the instance, we will still get the same error. Oh no!😒 What is the issue now? Well, we need to give the public subnet route to the IGW. See it as creating a channel between the IGW and the subnet. I know it has been a lot so far. You can take a water or coffee break; for me, it is a cold orange juice break.
Create Route Tables
Within the VPC, the route table allows private traffic between the subnets, what we have to do now is to allow traffic from the internet to the public subnet.
- On the VPC console, click on Route tables
- Click on Create route table, enter a name for the route table, and select the VPC we created earlier. Click on Create route table.
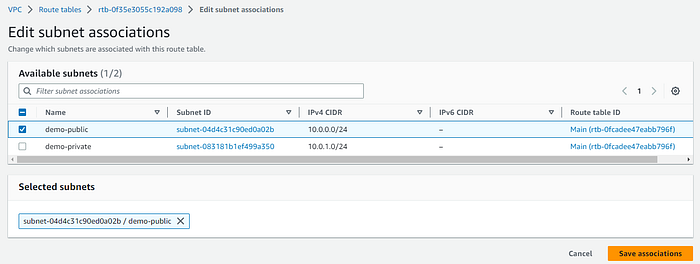
- On the route table console, select the route table we just created and click on Subnet associations. Click on Edit subnet associations.
- Select the public subnet we created earlier and click on Save associations.
- On the route table console, select the route table and click on Routes. Click on Edit routes.
- Let's add a route that will allow access to the internet. Under Destination, select 0.0.0.0/0. Under Target, select Internet Gateway, and select the IGW we created. Click on Save changes.
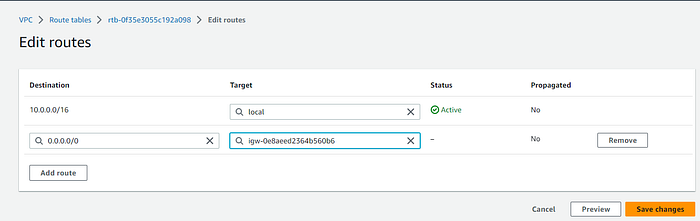
So we have successfully created a Route table, and associated it with the Public subnet, and created a route to the Internet gateway. We can now go back to the instance and connect to it. 😀
In this article, we have learned the basics of networking and gained some experience with Amazon VPC. It is recommended that before you set up your infrastructure, you create a custom VPC for your project. This will give you the privilege of adequately managing networking in your project. There’s a lot more in VPC, such as VPC peering, VPC endpoints, NAT gateways, and NACL, among others. Click here to learn more about VPC.
Thank you for reading. 🤝

